MITRE SAW BASICS
Let’s talk Mitre Saws. If you haven’t used one before they can seem a little daunting but they’re a fantastic tool making quick work of repetitive cuts, angled mitres and bevel cuts. Once you get a handle on the basics you’ll be wondering how you ever survived without one!
A CLEAR CUT
Mitre saws are stationary tools; set them up in a level area like on a workbench and take your timber to it. If it’s cordless, you can easily take it to where you project is, whether that’s inside or outside. Mitre saws come in a few different shapes and sizes. The blade determines the size of the timber you can cut and they’re perfect for making repeated cuts. Projects like trimming decking boards to length, cutting down skirting boards, shortening door frames and pretty much anything else that needs a perfectly straight cut or join.
Check out the features and some tips with Andy and Candy in our video below. We’ll introduce the types of cuts you can achieve with a Mitre Saw for your next DIY project and when it might come in handy!

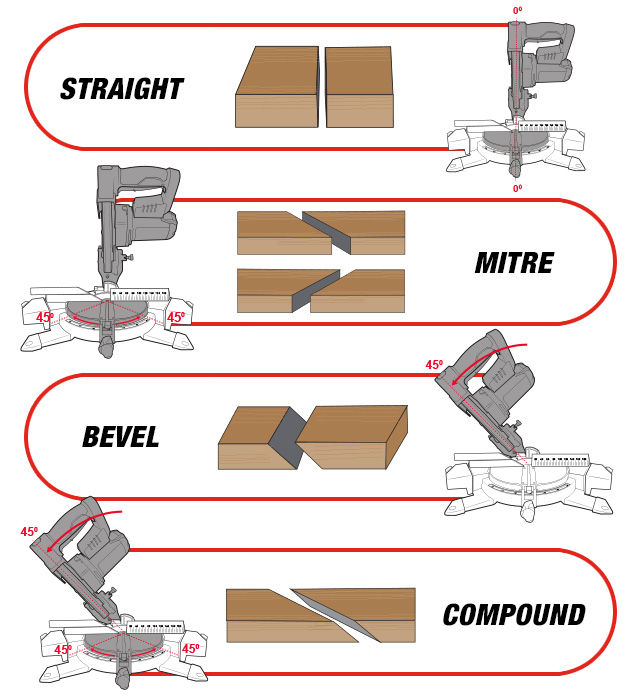
TYPES OF CUTS
STRAIGHT OR CROSSCUT:
A 90-degree cut across your workpiece is called a straight or crosscut. Commonly used when building furniture, framing up a wall, or when cutting long timber lengths down to shorter pieces to make them easier to work with.
MITRE CUT:
This is an angled cut on the face of the board. It could be used for picture frames or creating interesting and almost seamless joins in your project at whatever angle you design.
BEVEL CUT:
Bevel cuts are made when your mitre saw base is set at 90 degrees with the blade laying over on an angle. They’re great for making that shadow box or creating the perfect join in a skirting board around the bottom of a room.
COMPOUND CUT:
This cut is a combination of both bevel and mitre cuts. Commonly used in roof framing, furniture making, or when joining two or three pieces of timber at unique, uncommon angles.

Give it a go and consider a Mitre Saw on your next DIY project coming up. Find the Ozito & PXC range online or in-store at your local Bunnings Warehouse.
Check out more content from DIY with Andy & Candy here.

